
Applying your beauty products should be a sequence of pampering our faces with luxurious oils and creams.
Step 1- Cleanse the skin Twice
This is the best way to get rid of every molecule of dirt / grime on the skin.
Step 2 - Toner
Step 3 - Spot / Blemish Cream
If you use any type of treatment to help take down acne or to lighten scaring on the skin; now is the best time to apply these so that your skin can soak them up properly to give you the best benefit.
Step 4 - Serum
The general rule to using face creams is to apply a serum underneath them so that they can soak deeper into the pores giving you the best results whether its hydration or oil control etc.
Step 5 - Eye Cream
You should apply an eye cream before applying your moisturizer. This is due to the product having a thin consistency as they need to be clear of barriers (moisturizer). Apply your eye cream using your ring finger (as it's the lightest) and pat it underneath the eye bone and brow bone working outwards.
Step 6 - Moisturize
I personally love to use a moisturizer that contains SPF so it saves time and money. Apply by massaging it upwards and outwards starting from the neck.
Step 7 - Primer
By using a primer it makes your makeup stay on all day but also locks in all the work you do prepping the skin before going straight into the application of makeup.
Step 8 - Foundation
Step 9 - Concealer
This helps to cover up any blemishes that need some extra coverage. If using coloured concealer the colours best to use are:
- GREEN = Blemishes / Spots / Redness
- PURPLE = Dullness
- PEACH = Dark Circles
Step 10 - Powder
Helps set your makeup and soak up any excess oil. Sweep over shiny t-zones, chins and under eyes to set the concealer.
Step 11 - Bronzer then Blusher
Bronzing powders and creams are designed to etch in a gentle structure, so do this before defining your cheeks with a pretty wash of blusher on the apple of your cheeks
Step 11 - Eye-shadow, Mascara
Step 12 - Brows
The intensity of your eyebrows should compliment your eye-shadow.
Step 13 - Lip Liner / Lipstick
Match this to compliment your makeup look.
TOP TIP:
- Light Eye-shadow = Darker or brighter lip colour
- Bright / Bold Eye-shadow = Lighter lip colour
Step 14 - Fixing Spray
This just helps finish the makeup look and lock it in for the whole day
Sunday, 24 September 2017
Thursday, 7 September 2017
My Facial Routine
Step 1
I start off by cleansing around my eyes and lips using the Decleor Micellar Oil, as this helps melt down every last bit off makeup; even the stubborn waterproof mascara. I then add a little bit of water onto my skin so that it turns into a milky substance Then just wipe over with a damp cleansing cloth. You can use this as a facial cleanser as well, due to this being a 3 in 1 product; so it will remove eye makeup, facial make-up / cleanses and tones at the same time. LIFE SAVER!!!!
Step 2
I then like to use the Decleor Aromessence Neroli, just using 3 drops onto my fingers and rain drop / pat that over my face and neck area. This just really helps my skin to get the nourishment and correct nutrients it needs to keep it hydrated throughout the day.
Step 3
To finish with I use a pea size amount of the Decleor Hydra Floral Light Cream, just to lock in all of the products and give my skin a hydrating hug of moisture.

Where can I purchase these?
Wednesday, 2 December 2015
Kate Moss Lip Collection

 My go too lipstick this season that I am so in love with is the Kate Moss Collection. It gives you the most perfect lasting colour and it's hard wearing so you only need to re-apply later on in the evening. Or for a more fuller look you can add another layer that will darken the colour, depending on look you are wanting to go for you can add as many layers for a more dramatic look, or for a more natural and subtle look you would only need one coat.
I find that this collection defines your lips, giving that wow factor to your whole make-up look. The colour I tend to use is the 107 Wine.
Price: £5.49
Can Purchase These Here:

The best thing about this lipstick is that you can buy it in most high street stores and its not that expensive. But it does last you a long time, as it is long lasting wear so you don't have to worry about re-applying it all the time; like you would find yourself doing with most lipsticks these days.
Thursday, 2 April 2015
5 Reasons Why You Should Wear a Primer
If you don't own at least one makeup primer, then you're really missing out on the secret to a flawless and long-wearing base for your make-up. Although we often try to reduce the amount of products we apply to our face, in the constant search for minimal beauty, sometimes adding a touch of something new can make the world of difference to your overall routine.
Many people skip this step because they're confused as to how to use a primer, what benefits it can bring or even if it's worth the investment - but it 100% definitely is. Its this simple: all you need to do is apply a peas sized amount to your fingertips and apply a thin layer onto your skin, beneath your foundation. Mainly paying attention to you t-zone and chin in particular. If I am going to apply eye-shadow, I like to apply some on the eyelids in order to enhance the performance of my eye makeup and make it last longer.

Here are the five reasons you need to start using a primer today:
1. Allows Longer Lasting Wear on Your Make-up
The basic function of a primer is to aid the performance of a base; it provides a smooth surface to your skin, in which your foundation can grip on to, as well as creating a barrier between skin and makeup that helps to reduce any oiliness. If you need your makeup to last all day (and even all night,) then investing in a great primer is the first step towards longer lasting make-up.
2. Blurs Fine Lines & Imperfections
The silicone nature of many primers helps to brush over fine lines and imperfections so they're not as prominent. The formula 'sits' in the pores that would have been taken up by your base, helping foundation to look a lot smoother and reduce caking throughout the day.
3. Reduces The Appearance Of Pores
One of the biggest concerns among many women is the appearance of pores - particularly around the nose area. Despite what many makeup or skincare products claim, you can't close pores; however, you can reduce the appearance and help them to shrink a little to give a much better overall appearance. A primer will help to conceal pores and again prevent makeup from sitting in them.
4. Colour Corrects
If you're concerned about redness, dullness or an uneven skin tone, then a primer may be a great place to start. Many formulas contain colour correcting formulas or tints, including violet to reduce dullness and green to conceal redness and help correct any imperfections; using a primer pre-foundation can help give skin a boost and ensure it's looking fabulous.
5. Enhances Performance
There's nothing worse than spending hours perfecting your smokey eye look, drawing in striking red lips or contouring yourself into a Kardashian, only for it all to fall apart a few hours later. Using a primer can enhance the performance of products and ensure they stay put, so they can be as effective as possible. From long lasting eye shadows, to hydrating lipsticks and creamy blushers; adding a primer can help them perform as intended without the skin's natural oils messing things up.
Since I've was introduced to primers I've become a little bit addicted. Applying foundation straight onto skin now feels a little odd, while my base sans primer simply doesn't look or feel as good, or I don't achieve a longer lasting look on my make-up.
The first primers that I ever used includes:
- Benefit's Porefessional (£24.50) Buy Here
- Bare Minerals' Prime Time (£22.00) Buy Here
- Clinique's Superprimers (£20.00) Buy Here
- YSL's CC Cream Forever Light (£30.50) Buy Here
- NARS (£19.50 - £26.00) Buy Here
- Laura Mercier (Around £25.00 / $33.00) Buy Here
- Rimmel's Lasting Finish (£6.99) Buy Here
Many people skip this step because they're confused as to how to use a primer, what benefits it can bring or even if it's worth the investment - but it 100% definitely is. Its this simple: all you need to do is apply a peas sized amount to your fingertips and apply a thin layer onto your skin, beneath your foundation. Mainly paying attention to you t-zone and chin in particular. If I am going to apply eye-shadow, I like to apply some on the eyelids in order to enhance the performance of my eye makeup and make it last longer.
Here are the five reasons you need to start using a primer today:
1. Allows Longer Lasting Wear on Your Make-up
The basic function of a primer is to aid the performance of a base; it provides a smooth surface to your skin, in which your foundation can grip on to, as well as creating a barrier between skin and makeup that helps to reduce any oiliness. If you need your makeup to last all day (and even all night,) then investing in a great primer is the first step towards longer lasting make-up.
2. Blurs Fine Lines & Imperfections
The silicone nature of many primers helps to brush over fine lines and imperfections so they're not as prominent. The formula 'sits' in the pores that would have been taken up by your base, helping foundation to look a lot smoother and reduce caking throughout the day.
3. Reduces The Appearance Of Pores
One of the biggest concerns among many women is the appearance of pores - particularly around the nose area. Despite what many makeup or skincare products claim, you can't close pores; however, you can reduce the appearance and help them to shrink a little to give a much better overall appearance. A primer will help to conceal pores and again prevent makeup from sitting in them.
4. Colour Corrects
If you're concerned about redness, dullness or an uneven skin tone, then a primer may be a great place to start. Many formulas contain colour correcting formulas or tints, including violet to reduce dullness and green to conceal redness and help correct any imperfections; using a primer pre-foundation can help give skin a boost and ensure it's looking fabulous.
5. Enhances Performance
There's nothing worse than spending hours perfecting your smokey eye look, drawing in striking red lips or contouring yourself into a Kardashian, only for it all to fall apart a few hours later. Using a primer can enhance the performance of products and ensure they stay put, so they can be as effective as possible. From long lasting eye shadows, to hydrating lipsticks and creamy blushers; adding a primer can help them perform as intended without the skin's natural oils messing things up.
Since I've was introduced to primers I've become a little bit addicted. Applying foundation straight onto skin now feels a little odd, while my base sans primer simply doesn't look or feel as good, or I don't achieve a longer lasting look on my make-up.
The first primers that I ever used includes:
- Benefit's Porefessional (£24.50) Buy Here
- Bare Minerals' Prime Time (£22.00) Buy Here
- Clinique's Superprimers (£20.00) Buy Here
- YSL's CC Cream Forever Light (£30.50) Buy Here
- NARS (£19.50 - £26.00) Buy Here
- Laura Mercier (Around £25.00 / $33.00) Buy Here
- Rimmel's Lasting Finish (£6.99) Buy Here
Thursday, 15 January 2015
Beau Beads - Homemade Jewelry Review
.jpg)
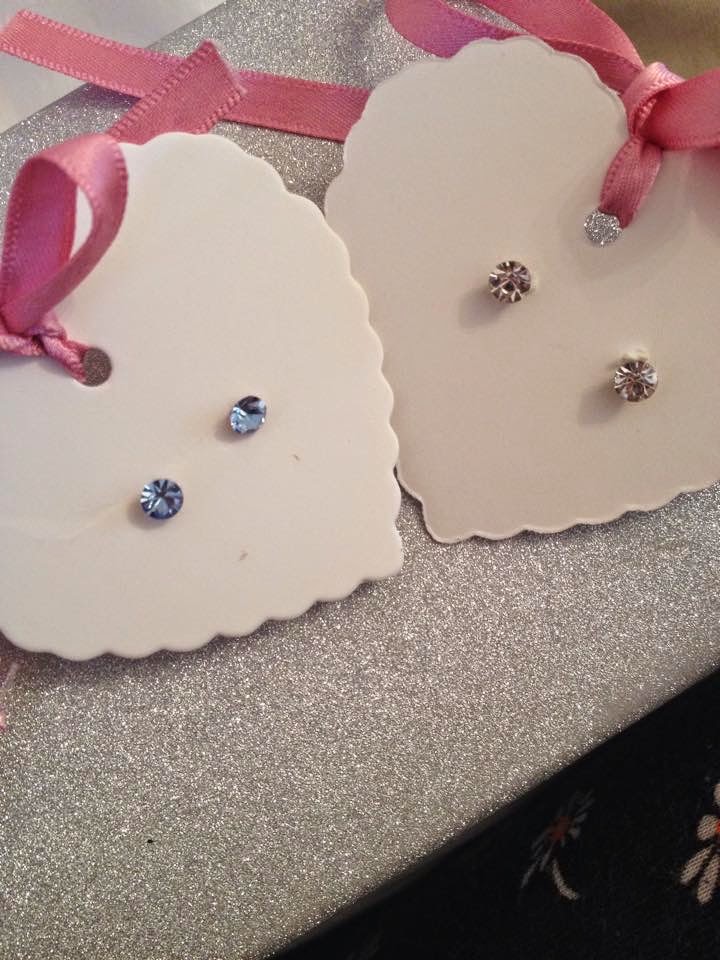
 Beautiful homemade jewelry that is perfect for everyone. This brand is handmade and is very affordable for everyone's budget for the quality that you are getting. The beads and jewels just shine and catch the light at the perfect angle and they sit beautifully with any outfit choice of the day.
These are perfect for that one special gift or just even to treat yourself. I find that these are the most affordable pieces of jewelry that I have ever bought and they have all caught peoples eye. I've been out with some of the items on and I have had a few comments such as: 'Where did you buy that necklace, it is gorgeous' and 'Is that a designer brand'.
You can buy your most perfect piece of jewelry here:
.jpg)
Monday, 12 January 2015
My Daily Make-up Routine

For my daily natural make-up routine, for when I have less time in order to get ready I uses these products above.
Foundation:
Rimmel Match Perfection (Shade 100 Ivory). I find that this gives you a natural colour and a healthy glow. You don't need to apply a lot to give you a full coverage as some foundations don't seem to give you a fuller coverage. During the day this has lasted up to 12 hours, without it fading. You can buy it here from boots at a price of £6.99 http://www.boots.com/en/Rimmel-Match-Perfect-Foundation_1281345/
Loose Powder:
Rimmel Match Perfection Silky Loose Powder (Shade 001 Transparent). I find that this gives you a natural matte finish to go over the top of your foundation so that you don't look oily. You can apply as much as you want and it wont look like you are clogged up on your skin. You can even use it as a base to your skin if you don't like wearing foundation. This has lasted all day until I have removed it at night, without it fading and I haven't topped it up. You can buy it here from boots at a price of £6.99 http://www.boots.com/en/Rimmel-London-Match-Perfection-Silky-Loose-Powder_1296961/
Eyebrows:
Seventeen Brows That Brow Kit. I no longer have to worry about there being a gap within my eyebrows or with them not being even. This is gives you a naturally defined look and allows your brows to become fuller. This product contains: Brow Wax, Brow Powder, Highlighter Powder, Brow Sculpting Pencil and a Brow Brush. You can buy it here for £5.99 http://www.boots.com/en/SEVENTEEN-Brows-That-Brow-Kit_1414692/
Lip Liner:
Helen E Lip Crayon (Shade Beauty Queen). This is ideal if you like a defined, matte look or you can use this as a base so that it seals in your lipstick on top. It helps to prevent the colour of your lipstick from bleeding and it is long lasting.You can buy it here for £8.00 http://www.helen-e.com/cosmetics/lips/lip-crayon--pencil-perfect-finish.htm
Lipstick:
Rimmel Lasting Finish Lipstick (Shade 080 One Of A Kind). I have found that this product can last for up to 8 hours and it gives you a colour impact that is guaranteed to turn heads. It has a smooth and creamy texture which makes it more comfortable to wear instead of it being sticky or drying.You can buy it here for £4.99 http://www.boots.com/en/Rimmel-Lasting-Finish-Lip-Stick_1133045/
Mascara:
L'Oreal Telescopic Mascara. It gives you a lengthening false lash effect that you can build up depending on the look you are wanting. It defines you lashes and give them and elongated look that you wouldn't normally get with a normal mascara. You can buy it from boots here for £10.99 http://www.boots.com/en/LOreal-Paris-Telescopic-Mascara_1247653/
Friday, 9 January 2015
Clean Start, Clear Skin
Cleansing:
STEP ONE - Always wash your face before bed. Not washing away the day's grime that has built up on your face during the day (whether you wear make-up or not)? There is still dirt lying on the surface of your skin which can lead into congestion on the skin. Use a cleansing wipe to remove the top layer of the dirt of the surface of your skin.
STEP TWO - Wash your face with a suitable cleanser for your skin. It should take you 30 to 45 seconds to cleanse your skin, as this is the amount of time that it takes you to clear all the dirt and oil off your face.
STEP THREE - Use lukewarm water when washing the cleanser off your face. This is as the hot water dries your skin out of any impurities and opens your pores, whereas cold water won't open up your pores.
STEP FOUR - Be gentle to your skin! Scrubbing your skin too hard will leave it rough and red. Don't fight with your face. Skip using any harsh scrubs and even washcloths, which can be too rough on your face and cause irritation. It is better for your skin if you use your hands. Make sure that your hands are clean, or you will end up transferring acne which can cause dirt and oil to come back to the surface of your skin.
STEP FIVE - Activate the products in your hands, before applying them onto the skin.This is as they will be more effective when they are applied to your face.
STEP SIX - If your skin still feels oily after you have washed it, then try an astringent after cleansing. When you over wash the skin is can make your skin produce even more oil!
STEP SEVEN - Left over cleanser equals left over dirt and oil on the skin. Wash the skin with warm water until the skin feels clean and smooth, and no longer slippery / soapy.
STEP EIGHT - Exfoliating the skin removes any layers of dead skin cells and dirt that are blocking your pores. You can even exfoliate in the shower - the steam opens up the pores, so the grains can penetrate the skin further to remove even more dirt from the layers of you skin.
STEP NINE - Don't forget to cleanse your skin in the morning! Any hair styling products get absorbed into your pillowcase then they transfer onto your skin. If it's not cleared away in the morning, it clogs your pores!
STEP TEN - Pat the skin dry.
Blemish Busting:
STEP ONE - If you have a acne skin, dermatologists recommend fighting it with a 3 step regimen: a salicylic acid cleanser, a benzoyl peroxide spot treatment and by the use of a daily moisturizer.
STEP TWO - Use a clay mask; the ingredients will penetrate deeper into your skin and clean out any excess oil and bacteria. It also exfoliates to open pores and get rid of the dirt that is clogged inside.
STEP THREE - Make sure to keep it simple with your face products. As too many products can irritate the skin.
STEP FOUR - Popping a pimple / spot can cause infections and cause it to spread making the situation worse.
STEP FIVE - If you have a pimple / spot problem, try a simple and easy home remedy! Cook some oatmeal as directed on the package, let it cool and then stir in some lemon juice and an egg. Dot the mixture onto the pimples with a cotton bud and leave overnight. The oatmeal's antioxidants will bring down the swelling, whilst the acid in the lemon kills the bacteria in your pores. The vitamin E in the egg will tighten the skin, so it appears evenly smooth.
Preventing Spots:
STEP ONE - Cleanse, Exfoliate, Tone and Moisturize daily (Morning and Night).
STEP TWO - Wash your makeup brushes regularly with a brush cleanser or baby shampoo. If you use makeup sponges, use disposable ones and discard them after each use. Therefore you can accumulate bacteria, which can lead to breakouts. Dirty brushes = Breakouts on the skin!
STEP THREE - Gently stroke toner onto your skin using a cotton pad. Your T-zone may be oilier, so it needs more love. Use an oil-free moisturizer with SPF every day to keep your skin smooth and protected.
STEP FOUR - Sunscreen isn't just for summer, your skin needs protection every day, even in winter. Look for a daily moisturizer and a foundation that contains SPF, preferably 'lightweight' / 'oil-free' / 'oil-controlling'.
Subscribe to:
Comments (Atom)